When Should I Plant Okra?
If you live in a warmer climate, you can plant your okra in the early spring and then plant a second crop in June. In cooler climates wait until nighttime temperatures climb above at least 60°F (16°C), daytime temperatures are around 85°F (29°C), and soil temperatures reach 65°F (18°C), which could mean waiting until June or two to three weeks after the last frost date in your area, to plant your first crop.
Because okra grows slowly until temperatures really warm up, you might want to start your okra indoors or purchase okra seedlings rather than seeds. In cooler climates, wait to start your okra until 3 to 4 weeks before the last frost date in your area, which will be about 6 weeks before you should transplant your seedlings to your garden.
If you plan to start your okra under a grow tube or a cold frame until temperatures warm, you could sow your seeds directly in your garden 3 to 4 weeks before the last frost date in your area.
How Do I Start Okra Indoors?
Okra seeds have a hard, protective coating that can interfere with germination. You have three choices that will speed germination. You can use a file to create a nick in the coat of each seed, or you can either wrap your seeds in wet paper towels or soak them in water overnight on the night before the day when you plan on planting your okra.
Your okra seedlings will have fragile taproots, so it’s best to start the seeds in peat pots with only two seeds per pot. If you don’t want to risk damaging the taproots while untangling the seedlings for transplanting, you can cut off the weaker of the two seedlings. Cover the seeds with 1/2 inch of a potting soil blended for vegetables or vegetables and herbs. Keep them in a warm, sunny room or place them under a white fluorescent light or a grow light.
How Do I Transplant Okra Seedlings?
Water your seedlings thoroughly about an hour before transplanting. When you are ready to begin transplanting, remove the seedlings carefully from the pot, or, to avoid damaging the roots, leave them in the pot. Space them 18 to 24 inches apart in rows that are 3 to 4 feet apart. Plant them about 1/2 inch deeper than they were when they were growing in the pot.
How Do I Sow Okra Seeds Directly in the Garden?
Remember to nick or soak your seeds before planting them. Use a hoe to create a trough 1 inch to 1/2 inch deep, and space your seeds 3 inches apart in rows that are 2 to 3 feet apart. When your seedlings are 2 to 3 inches tall, thin them to 18 to 24 inches apart, choosing the strongest plants.
Where Should I Plant Okra?
Okra requires at least 6 to 8 hours of full sun and grows best in the heat of summer. It does not tolerate shade. In shade, it may not live and, if it does live, it produces fewer pods.
It prefers loamy or sandy soil with a pH balance of 6.0 to 6.5 although it will grow in many soil types and in soils with a pH as high as 7.6.
If you want to harvest the seeds from your okra plants at the end of the growing season, separate each species of okra that you plant by 500 to 1,600 feet to prevent cross-pollination. If your okra is cross-pollinated, you won’t be able to be certain about the characteristics of the okra plants that grow from the seeds. Then again, you may inadvertently create a brand new hybrid that you can name for yourself.
What Do I Need to Do to Prepare the Soil for Growing Okra?
If your soil has a higher degree of acidity than 7.6, or if you don’t know the condition of your soil, have it tested in the fall by your local extension agency and follow their recommendations regarding the amount of lime you will need to add to the soil to reduce the pH level. They will also suggest any other nutrients that your soil might need.
Lime should be added in the fall, a few months before your next growing season begins, and some organic fertilizers should be added about a month before planting to allow them time to age.
One ideal place to plant your okra would be in the space where you planted peas during the previous growing season because peas add nitrogen to the soil as they grow. You can also work a layer of rich compost or aged manure into the soil to a depth of 15 inches.
What Varieties of Okra Should I Plant?
Many varieties of okra are covered by tiny spines that can irritate your skin when you harvest them, but, fortunately, not when you eat them. Spineless varieties include:
- Louisiana Green Velvet – a vigorous grower that can reach a height of 6 feet making it a good choice for large spaces.
- Cajun Delight – a hybrid that grows to a height of 4 feet and produces dark green pods.
- Annie Oakley – reaches a height of 5 feet; pods mature in 52 days.
- Annie Oakley II – reaches a height of 4 1/2 feet and produces dark green pods.
- Clemson Spineless – reaches a height of 4 to 5 feet and produces dark green pods.
If you live in a cooler climate, try the following varieties:
- Clemson Spineless
- Cajun Delight
- Annie Oakley II
- Red Spray – a red stemmed plant that produces numerous deep wine-red pods that turn dark purple when cooked; pods mature at 5 inches long in 55 days but can be picked earlier.
- Burgundy – reaches a height of 4 feet tall and produces burgundy red pods.
If you are looking for varieties that make harvesting easy, try base branching varieties like Park’s Candelabra Branching.
If you are looking for varieties that add color to your dishes for special occasions, try Burgundy or Red Spray.
Will Okra Grow in Containers?
Because full size okra plants can grow to heights of 8 feet or more, consider the following dwarf varieties for container gardening:
- Cajun Jewel
- Baby Bubba
Choose planters that measure 12 inches to 14 inches deep to ensure that there is room for the tap root. Use a separate pot for each pant, or make sure that the plants can be spaced 18 to 24 inches apart. Fill in the space between the plants with flowers or some of okra’s companion plants.
You can use almost any type of container as long as it has a sufficient number of holes to allow for drainage. Just be certain that repurposed, “found” containers have never held hazardous materials.
For container gardening in general, use a potting soil that is blended for herbs and vegetables or vegetables. Top soil is too heavy for container gardening and doesn’t allow for proper drainage.
How Do I Care for Okra?
If you have planted your okra in the spring, it will grow slowly until soil and air temperatures warm. Until warm temperatures send your okra into a growing frenzy, you will need to weed it regularly. A 4 to 8 inch layer of mulch both discourages weeds and retains soil moisture, but leave space between the mulch and the stems of your okra plants.
Your okra needs at least 1 inch of water per week throughout the growing season, especially during germination and while it is flowering. In dry climates, your okra may need even more water. During pod production, your okra will be better able to tolerate dry conditions. At that stage of its growth, giving your okra a soaking watering that sinks deep into the ground every seven to 10 days should be enough.
To prevent rotting, water okra in the morning so that the plants and the top layer of soil can dry during the day. Use a soaker hose to keep water off of the leaves. Droplets of water can act like magnifying lenses, intensifying the rays of the sun and burning the leaves – an okra sunburn.
You can apply a balanced, organic, liquid fertilizer once a month.
Also, spread 10-10-10 aged manure or a compost that’s rich in organic materials around your okra three times during the growing season – after thinning your seedlings, after the first pods begin to appear, and about halfway through the growing season. This is called side-dressing your plants. Use about 1/2 pound of manure or compost per 25 feet of row.
Remove the lower leaves from your okra after your first harvest to speed up the development of pods.
Because some varieties of okra can grow to 6 to 8 feet tall, you can cut back about a third of the top of your okra plants in late summer. The main stalk will keep producing pods at a manageable height for harvesting.
What Are Okra’s Companion and Combatant Plant?
Okra grows very tall, so avoid growing it around plants that require full sun. On the other hand, since okra has a long taproot, you can grow it with shade-loving plants that have shallow or medium-depth root systems like lettuce. Sow you lettuce behind a row of okra seedlings or intermingle your lettuce with your seedlings.
Because spring crops of peas and spring peas fix nitrogen into the soil, they are great companion plants for okra. By the time warm weather arrives and okra begins its growth spurt, you will have completed the spring harvesting of your peas.
The roots of a spring crop of radishes loosen up the soil for the roots of your okra plants, enabling the okra roots to grow even deeper and stronger. Space your okra and radish seeds in the same row 3 to 4 inches apart.
Cabbage loopers love okra, but they hate peppers. So, after you harvest your radishes, transplant your pepper plants between your okra seedlings, and the peppers will repel the cabbage worms.
Stink bugs love okra too, but stink bugs also love peppers, beans, and tomatoes. Beans, peppers, and tomatoes lure stink bugs away from okra. While peppers do their best job of repelling cabbage worms when planted between your okra plants, you might want to plant other lure plants, like tomatoes and beans, a short distance away from your okra. Stink bugs also can be removed from your okra by hand.
Planting sunflowers and other flowering plants near your garden attracts bees and other pollinators to your okra and other vegetables as well as attracting species like trichogramma wasps, tachinid flies, hoverflies, and green lacewings. The larva of these insects prey upon stink bugs and caterpillars such as cabbage worms.
What Other Pests Are Attracted to Okra?
Aphids, corn earworms, flea beetles, and, in warm climates, root-knot nematodes also enjoy dining on okra.
Aphids have weak legs. Flick them off of the leaves with a splash of water from your hose, and it’s unlikely they will be able to climb back up the stalk. Diatomaceous earth spread around the base of your okra will pierce the soft bodies of aphids and caterpillars, causing them to become dehydrated and die. Ground beetles prey on aphids, caterpillars, and root-knot nematodes, but also may prey on beneficial nematodes as well.
Corn earworms are the caterpillar of the nocturnal Helicoverpa zea moth. Row covers will prevent this moth and others from reaching your okra to lay their eggs. Trichogramma moths destroy the eggs, and damsel flies, green lacewings, and minute pirate bugs prey on the caterpillars.
Flea beetles are repelled by catnip and basil while radishes and nasturtiums serve as lures.
Plants infested with root-knot nematodes will be stunted, have yellow leaves, and appear to suffer from a nutrient deficiency. This is because the nematodes attack the roots causing swelling and knotted galls that interfere with the plants ability to transport moisture and nutrients from the soil to the leaves.
To eliminate these nematodes, destroy infected plants; don’t place them in your compost. Replace the soil where the infected plant grew before replanting, preferably with nematode resistant crops. Rotate your crops and avoid planting okra in the same space for three to five years. Keep your gardening tools clean, and keep weeds, fungal diseases, and other pests under control to keep your okra healthy.
Soil solarization also helps eliminate root-knot nematodes. During the hottest month of the year, moisten the soil and cover the area with a sheet of clear plastic tarp for four to six weeks. If the soil dries out, re-moisten it.
The soil should remain in full sun, and at least the top 2 inches of the soil must remain at a temperature of 122°F (50°C) for the entire four to six week period. Maintaining that temperature may be difficult or even impossible in cooler climates. However, African and French marigolds contain substances that suppress root-knot nematodes when the flowers and leaves are plowed into the ground at the end of the growing season.
Organic sprays such as Bacillus thuringiensis, Spinosad, tomato leaf spray, garlic spray, and sprays made from dishwashing liquid or other liquid soaps also kill or repel insect pests. It is especially important to test the concentration of your garlic spray mixture on a few plant leaves before spraying all of your plants, though. Some concentrations are too strong for some plants, so as you determine which concentrations work best, create labels for each concentration including the amount of each ingredient in the concentration and the plants on which it should be used.
Tilling the areas of your garden where you are not overwintering crops disrupts the pupa stage of the insect life cycle and further reduces the number of pests invading your garden. Eliminating brushy areas near your garden removes winter habitats for adult pests.
What Are the Diseases That Can Attack Okra?
White mold, powdery mildew, bacterial spot, fusarium wilt, vascular wilt, and Southern blight can all infect okra.
Keeping the leaves dry by using a soaker hose and watering in the morning to give the plants and upper layer of soil a chance to dry out before nightfall helps to prevent molds and mildews.
Fusarium wilt, vascular wilt, and Southern blight are soil-born fungal diseases that can survive in the soil for years. To prevent fusarium wilt:
- Make sure that the soil is well drained.
- Maintain a pH level of 7.0.
- Keep all of your gardening tools clean and sterilize them with a bleach solution if they come in contact with infected plants or soil.
- Keep weeds and pests under control, especially the cucumber beetle. This beetle can spread fusarium wilt.
- At the end of the growing season, remove all of the organic material from your garden.
- Plant wilt resistant plants in the area.
- Soil solarization may help in warm climates.
Infected plants will be wilted, yellowed, and stunted. If plants become infected, remove them from your garden and destroy them. Do not add then to your compost.
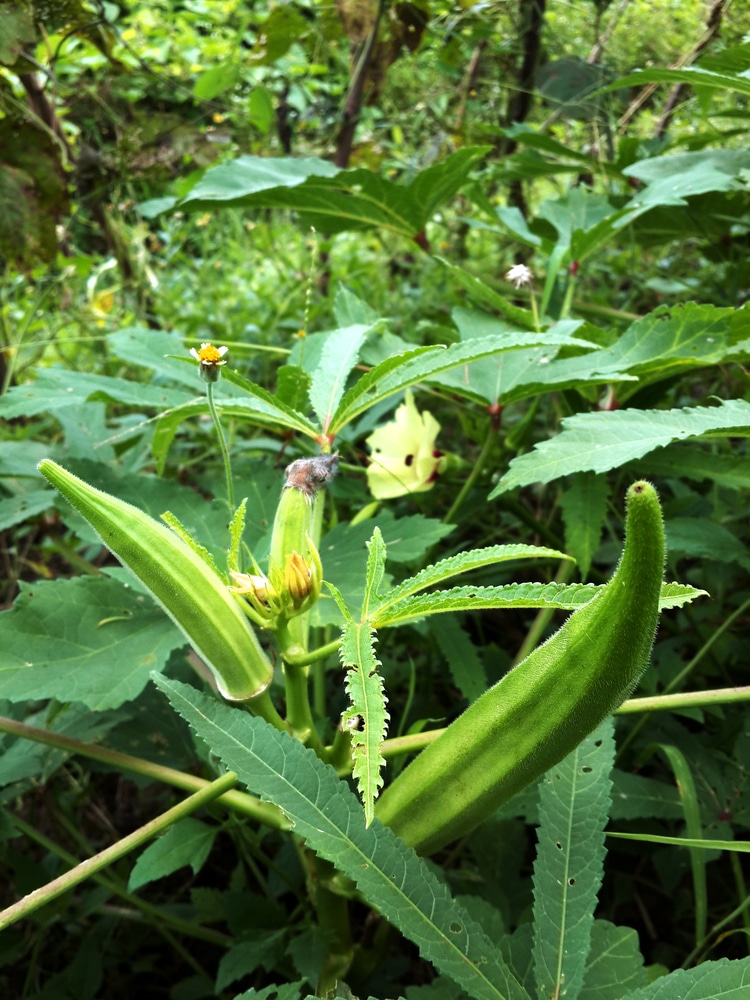
How Do I Know When Okra Is Ready to Harvest?
When okra starts producing, the pods appear quickly. You will see them appear first low on the plant and then they will begin to appear at increasingly higher levels. Start watching for the pods to appear 50 to 60 days after you planted your okra or five to six days after flowering. The pods will be ready to harvest when they are 2 to 3 inches long, about the length of your fingers.
Once you begin harvesting okra pods, new pods will appear daily and be ready for harvesting every two to three days. This means you will need to check your okra plants daily for pods that are ready for harvesting.
When pods become mature, they become tough and woody. If you are in doubt about a pod, take pruning shears or a sharp knife and try to cut the stem to remove the pod from the plant. If the stem is difficult to cut, the pod is too mature to eat.
As long as you want to continue harvesting your okra, remove these pods. Leaving them will slow pod production as the plant focuses on producing the seeds. Your okra will stop producing pods with the first frost, however. So, as that date nears, you can leave some of the larger, tougher pods to grow to maturity. When the seeds are ready to be harvested, the pods will turn brown and dry.
How Do I Harvest Okra?
If you didn’t plant a spineless variety of okra, wear gloves and long sleeves when harvesting your okra because the spines can irritate your skin. Whether you are harvesting your pods for food or for seeds, use pruning shears or a knife to cut the stem just above the cap on the pod. Leave a short stub of stem on the pod. If the stem is so tough that it is difficult to cut, the pod has become too mature for eating.
How Do I Store Okra?
You can store okra in your refrigerator at temperatures between 45°F to 50°F (7°C-10°C) and humidity levels between 90 and 95 percent, but it will deteriorate quickly in a week or less. For longer term storage, you will need to pickle, can, or freeze your okra. Always be sure to label your packages and jars with the date you froze, canned, or pickled the okra and which pickling or canning recipe you used.
Freezing Okra
Immediately after harvesting, you can place your okra pods in plastic bags and store them in your freezer without cooking them.
You can also blanche the pods in a pot of boiling water for three minutes and then plunge them into an ice water bath. Blanching your pods destroys the bacteria and enzymes that would spoil the nutritional value, texture, flavor, and color of the okra.
Cut your blanched okra into small, bite-sized, 1/2 inch cubes, spread them out on a cookie sheet, cover them with freezer wrap, and place them in your freezer for two hours until they are solid.
Store your diced okra in freezer containers or freezer bags that you fill within 1/2 inch of the top. Remove as much air as possible from the freezer bags.
Basic Instructions for Canning Okra
Place 4 quarts of cut okra in pan with 4 quarts of water, 4 tablespoons of canning salt, and 1/2 cup of vinegar. Bring the water and okra to a oil, and then remove the pan from the heat.
Follow the instructions for heating your canning jars and lids, and then fill the jars to within 1/2 inch of the top. Carefully wipe the rim of the jar to remove anything that could interfere with forming a seal, and then place the lids on the jars.
Follow the instructions for completing the canning process.
When the jars have cooled, test them to make sure thaty they have sealed. If any have not sealed, use those jars as soon as possible.
Pickling Okra
Depending on your tastes, you can choose from a number of okra pickling recipes that are available online. Try several different ones.
How Do I Save Okra Seeds?
Hang the pods in mesh bags or spread them out on landscaping fabric or screens until they become brittle. To remove the seeds, you can break the pods open and work them with your hands until the seeds release or simply cut the stem end of the pod open with your pruning shears and pour the seeds out. Screening and winnowing easily separates the large okra seeds from the chaff.
To make sure that you have preserved enough viable seeds for the next growing season, save the pods from at least one plant. However, if your intention is to maintain a particular variety of okra for many generations, you will need to save the seeds of five to 10 plants. To preserve a rare variety of okra, preserve the seeds from at least 25 plants. Seeds that are protected from pests and stored in a dry, cool, dark place should remain viable for one to three years.
If your intention is to maintain a particular variety of okra or any other plant species, you need to save large numbers of seeds to maintain a diverse pool of beneficial genetic traits and reduce the likelihood that destructive recessive traits may gain dominance.