The Benefits of Trellising
As vining plants, cucumbers are natural climbers with tendrils designed to cling to the nearest vertical support. They’re simply happier and more productive doing what Nature intended and letting them do it has several advantages for you.
Trellises Save Space
Left to sprawl on the soil, a single vining cucumber plant requires up to 25 square feet of space — and if you’re a small space gardener, that’s not good. A trellised cuke takes up only 1 square foot of soil, leaving more for other veggies.

Expert gardener’s tip: Trellises are meant for vining cuke varieties, not the smaller bush types bred to sprawl. Bush cukes typically need less than 9 square feet of horizontal space.
Trellises Save Labor
Trellising your cukes makes weeding much easier, because the weeds are visible as soon as they sprout. You won’t have to spend time clawing through the vines to find them. At harvest time, you won’t be on your knees in the soil searching for the fruit; it will be hanging straight and clean from a comfortable picking height.
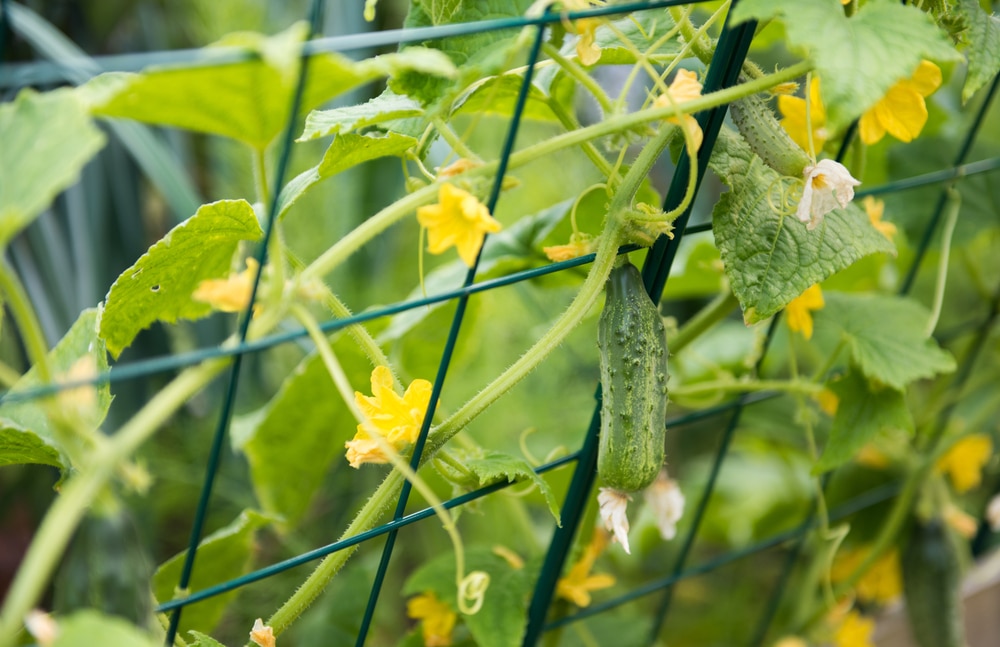
Trellises Reduce Disease
Fungal diseases love sprawling cukes because their leaves trap moisture. Cukes growing on trellises dry quickly, thanks to improved air circulation and more leaf area exposed to the sun. You spend less time removing and disposing ofmildewed foliage.
Building a Trellis
Whether you want to support one cuke or many, here’s two how-to trellis building ideas to meet your needs. The first takes almost no work; the other requires moderate carpentry skills. Whichever you attempt, it’s critical to have it in place before planting your cukes. Otherwise, you might destroy their developing roots.
Expert gardener’s tip: Building either of these trellises will go much more easily if you wait for a day when the ground is soft from rain.
Teepee Trellis
Even young gardeners have fun building this durable, lightweight and eco-friendly trellis made from the simplest materials:

- Four 6-foot-by-1.5-inch bamboo poles
- Hammer
- One heavy-duty rubber band
- One ball of heavy garden twine
- Scissors
- Measuring tape
Steps for building the trellis:
- Gather the tops of all the bamboo poles in one hand with their lower ends even.
- With your free hand, slip the rubber band over the tops of the poles and slide it down 2 inches. Make sure the bases of the poles remain level as you secure the rubber band around their tops.
- Cut a 2-foot length of twine. Wrap it around and through the tops of the poles of the poles beneath the rubber band. Keep wrapping until they’re tightly secured. Finish with a double bow.
- Spread the bases of the stakes apart until you have a teepee.
- Hammer the teepee into the soil until it’s stable.
- Measure the teepee’s bottom-to-top diameters at 1-foot intervals above the soil.
- Cut twine long enough to tie around the poles at each measuring point. They’ll provide extra support as your cucumbers grow.
Rebar Trellis with Nylon Netting
This trellis requires basic carpentry skills, but the netting is a real time-saver. Find all the materials at your local home and garden store:Two 4-foot pieces of 3/8-inch rebar
- One 10-foot piece of 1/2″ electrical conduit tubing
- Hammer
- Conduit bender
- Measuring tape
- Marking pen
- One conduit coupling
- Trellis netting, 5-foot-by-10-foot length
- Scissors
Steps for building the trellis:
- Place one piece of rebar at each end of your cuke bed and hammer it 24 inches into the soil.
- Measure and mark 6 feet on each piece of conduit tubing.
- Bend each piece of conduit into a 90-degree angle at the 6-foot mark.
- Insert the conduits into the rebar, line them up and join them at the center with the connector.
- Remove the joined conduits and lay them flat on the ground.
- Unfold and stretch trellis netting between the conduits. Place it so the factory edge — the one with 2-inch lengths of string attached — runs up one side and along the top.
- Start tying off the netting at the bent corner, working down-across-down and stretching it gently as you go.
- When you reach the opposite end, cut the netting’s excess length in the middle of its squares to make a new set of tying-off strings.
- Re-insert the completed frame into the rebar supports.
Finishing the Job
After your trellis is finished, space your seeds or transplants 12 inches apart along its base. When the plants are large enough, gently wind their tendrils around the lowest string or netting squares. After that, they’ll know what to do!